Mebane-Nuckolls House


Guest Bedroom and bath
"They did such an amazing job restoring that house. It's beautiful. I'll bet you're enjoying using it."
Well, let me say first that there is much to enjoy. But folks, this is a weight-bearing wall. It's over the doorway to the guest bedroom downstairs. One of the rooms that first greeted visitors and resulted in a lot of oos and ahs. It's also one of many reasons why I don't want guests walking around upstairs yet.
There were some really funky angles going on with the sheetrock walls and modern moldings in this room, and the ceiling had been lowered over a foot. We needed to find out why and how they were "restored," and decided to go back with plaster as was originally done on the walls and ceiling. So the walls were stripped back to the brick for a fresh start. It should be noted that all of the walls in this house are solid brick. This includes the partitions between rooms.
For those who know something about carpentry and load bearing, this is not how to build a proper header. In this case, boards of varying thicknesses and widths were randomly assembled. No! And brick repairs need to be tied into the existing work, not just sitting on top of the header. Rows need to be level to be stable. Bricks are incredibly strong in compression but weak in tension.
In addition to haphazard bricklaying, we found empty mortar bags crammed into gaps (arrows).
Note the patch job on the beaded moulding that the top door hinge is screwed into. The hinge itself was broken and made up of mismatched parts. As a result, the bottom hinge was supporting the full weight of this massive door.
The worst phrase in the English language is "You don't have to do that."
Instead, you can just cover it up with sheetrock, paint it a pretty color, and decorate the room nicely. And not worry that the brick wall above this doorway is over 15 feet tall. Or that someone might be sleeping upstairs.
We tore it all out. Our reconstructed lintel (header) was made from two hand-hewn white oak beams that came out of an 1830s Somerville, TN house. They span the full 12" thickness of the wall. John Jenkins then rebuilt the brick wall above the lintel.

What's up with the corners and ceilings in this house?
The front bedroom and parlor had been stripped down to the brick walls and then sheetrocked in the 1980s. An unusual stud wall was put in place prior to installation of the wallboard. The studs were ripped at varying thicknesses, resulting in bizarre angles in the walls and moldings. Corners in the rooms were no longer square.
These crown moldings are interesting, but the rooms did not have them originally.
The plaster ceilings had been scrapped, lowered 13", and replaced with darkly-stained, knotty pine siding with a modern v-groove profile. This was done throughout the house. When I asked why, the answer was "I liked it that way." It was an honest answer from a straight-talking man.
But we have something else in mind.
The original baseboards had been thrown out in favor of these panelled ones made up from modern-dimension lumber.
In other rooms, additional liberties had been taken by coffering the ceilings. These will be shown later.

From the ground up
The ceiling had been lowered 13 inches, supposedly to allow for plumbing and wiring. We found that to be unnecessary, and removed the redundant joists and modern siding that had been used for a ceiling. It brought us back to the original 12 1/2-foot ceiling height.
Unfortunately, the floor had to come up. A large portion had already been replaced, and there was a big hole for a floor furnace that we no longer needed after bringing in central HVAC.
Almost all of the original 3" x 12" oak joists are in good shape, but we needed to level the whole thing out and support it for the next few generations.
Jim and Juan are ready to pour the footings for eleven new piers.

Plastering begins
There is nothing that looks like plaster. On modern construction, sheetrock is the way to go, but not on these walls.
After cleaning, a bonding agent was applied to the wall. This will allow the scratch coat to stick to the bricks without requiring lath, which will be needed on the ceiling.
Stan McAuley needs to establish a reference plane that is plumb and sets the plaster thickness to meet the window frames as originally done. He starts by temporarily mudding in two wood strips with a level. Everything will come to this plane.

A good bit of effort was required on the ceiling. Most of the original joists were in good shape, but the supports had given way in areas and it was sagging.
Jim and his crew brought the whole thing level and stiffened it up with additional 2 x 12 joists and pressure blocks. I wanted this taken care of on the front end so future work on the upstairs bedroom wouldn't end up damaging the new plaster ceiling in this room. This also required rebuilding the upstairs hearth support now.
The old wood lath was long gone, so we went with metal. A purist might not agree, but this is one case where I think the modern method is superior.
The new guest bath is to the left.

Solid brick walls present special challenges. Among these are providing a method for securing door frames, baseboards, and other moulding. Since the walls are not hollow, plumbing and wiring become major issues.
The original builders realized a simple and elegant solution for attaching woodwork: nailers. These are simple wood blocks that are inserted instead of bricks. We went back with poplar nailers as before. The photo shows one that has already been mortared in place. The others will be leveled up and set the same way.
We cut out inserts for all the electrical boxes and secured them in mortar after cutting grooves in the wall to allow the wires to be imbedded. All of this will be covered by the plaster.
The previous owner simply ran the wires on the outside of the wall.

The mantel has been restored, the hearth and fireplace rebuilt, the back half of the baseboards has been installed, and the first layer of the plaster (scratch coat) has been laid down.

I have spent many hours on this particular quest.
All of the original baseboards had been removed from the front of the house and thrown away in the 1980s.
I had a few old pictures that were interesting, but simply too grainy to provide adequate detail. Ray Rosser recently let me scan some of his pictures. I magnified and Photoshopped them, and went looking around the house.
Fortunately, there was one baseboard that hadn't been removed. It extends up along the servant's stairs, and matches perfectly.
I traced the profiles, completed the drawing in Photoshop, and ordered CNC-machined router bits made by Orbit Tool Works.
Now for the fun part: making enough to go around four 20x20 rooms, entry hall, upstairs foyer, and front stairwell. We need to make about 400 feet of this!
Lower photo: new 12 3/4" high baseboard.


Lighting
We purchased an 1840s solar three-arm chandelier for the primary ceiling fixture. Originally an oil-burner, it has been electrified.
The 1860 harp-style gasolier hangs over the alcove.
A pair of 1850 Cornelius gas swing-arm sconces fitted with etched glass shades are mounted on either side of the fireplace.
For the bathroom, we went with an 1850 two-arm electrified gas fixture as the main ceiling light.
A pair of 1890 sconces flank the vanity mirror and a flush mount fixture from the same period is over the shower.

Old "wavy" glass.
The windows are huge and were originally counterbalanced. Over time, the pulleys had frozen up and the cords had been cut or worn out. Chases for the weights were full of dirt dauber nests. Most windows were painted shut. We are restoring all of them as we go. I had to order new weights for the master bathroom, but all of the windows in the front of the house retained their old weights. Cord was originally tied with a leather washer between it and the weight, and the loose end was whipped. We went back with brass window chain which should last a very long time. It is so much easier to open and close these heavy windows now.
Done

The painting is done, heart pine flooring is installed and finished, antique lighting fixtures are in place and we've moved the furniture in.
We were able to match the trim color to an original piece that was uncovered. I contacted Farrow & Ball, and Julie at their Chicago office worked out a paint scheme for the front three rooms. They didn't charge for this service.
The rosewood half-tester bed and matching dresser were made by Mitchell & Rammelsberg around 1860. The bed is 10 ft. 8 in. tall and the dresser is 9 ft. 11 in. From the Tennessee Tales story, we know that John Howe Mebane ordered the furniture for this bedroom from Cincinnatti. Since M & R were by far the largest furniture maker in Cincinnatti at the time, it is likely that this set is from the same maker as the original Mebane furniture. The rosewood half commodes sitting on either side of the bed are also by the same maker.
Bonnie and Ken Cummins came up with the crewel drapery design.

Details on the crests of the bed and dresser reveal they are from the same set.

An old soldier returns. William Graves Mebane was an infantry captain in the Civil War. After serving in numerous battles, he was captured at Kennesaw Mountain and spent time in a brutal POW camp. WGM became ill, probably with tuberculosis, and was paroled. The family set this room up for his recuperation. He's buried in our back yard, but returns to a prominent position in what is now our guest bedroom.
Yancey Mebane gave us a copy of an old tintype that was taken in Memphis after WGM and his brother enlisted. I thought it would look good above the mantle, but was concerned about how well it would take to magnifying to this scale.
After a good deal of work cleaning it up in Photoshop, I sent the file off to Bay Photo and had them print it directly onto an aluminum plate.
The guilded frame is from the period, 1850-70.

The rosewood ladies' writing desk was probably made in New York around 1850.
The piano stool is from the same period.
One of a pair of Meeks chairs, ca 1870.

We ended up with an L-shaped room with a nice alcove to the east of the fireplace.
A much-needed closet was built, and we have a large storage area above it which extends over the bathroom.
Six doors, their trim, and the baseboards were made in our shop.
The pair of ladies' chairs were made by Meeks around 1870.
The 1840 mahogany armoire is just over 8 feet tall. It came from a house in Columbus, Mississippi.
To its left is a small stand from the Connecticut river valley, ca 1800.


I installed this pair of ca 1840 semi-mortise bolts on the stationary closet door. It was a fun project and added a nice detail.

The guest bath is completed!
Having ripped out all three bathrooms from the front of the house, we have been having to make do with one bathroom in the main house for months. This has created some anxious moments.
For the vanity base, I bought a marble-top chest made around 1880 and modified its upper two drawers to clear the plumbing. Two holes were drilled in the top, and we installed a blue-and-white vessel sink Bonnie found.
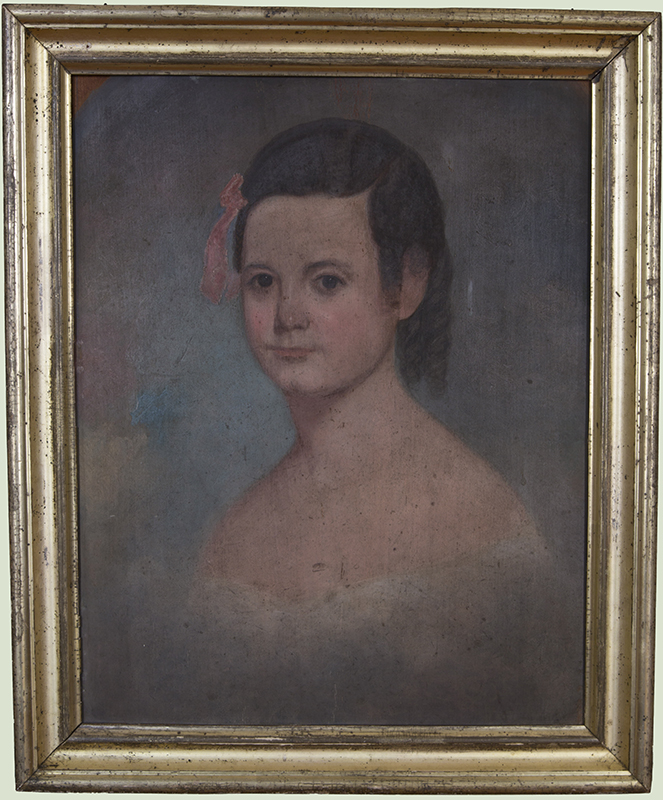
Giles Mebane gave us this portrait while I was visiting the family in North Carolina in April, 2014. She is one of the twin sisters of Wm. Graves Mebane and John Wood Mebane. Bettie died on or before age 9, prior to the move to Tennessee. Nannie died at age 12 and is buried here.
John Howe Mebane and Henrietta W. Mebane endured a great deal of suffering. Each lost a spouse prior to this marriage. They then lost John's twin daughters. Anne, Henny's daughter from her first marriage, then passed away at age 18. John and Henny had one child, also named Henrietta. She died before her parents at age 17. One of John's sons was killed in battle during the Civil War. The other contracted tuberculosis while in a P.O.W. camp. He remained sickly, and died at age 44 after his parents passed away.
Fortunately, Wm. Graves Mebane had children who prospered despite the harsh realities of Reconstruction.
The portrait is now in the guest bedroom. She graced a wall in this house at least 158 years ago and has now returned.
Forward to Page 7: Entry Hall, Stairway, and parlor
Ronnie M.Warner, M.D. Bonnie R. Warner